Foodie Fave: Champagne Jello Shots

Ok, guys. We’re about to get next level with jello shots – champagne jello shots! The minute I saw this post from Sugar and Cloth I knew I had to share it with you all. Especially with New Years’ Eve right around the corner, these are the perfect compliment to that champagne glass in your hand. Cheers, darlings!

  • 8 oz Champagne or Cava
  • 4 oz Gin
  • 2 oz fresh squeezed lemon juice
  • 2 oz simple syrup (quick recipe below)*
  • 2 packages Knox gelatin
  • Edible gold leaf for garnishing (optional)

Combine the simple syrup and lemon juice in a cocktail shaker filled with ice. Shake well, then pour into a medium saucepan and sprinkle with gelatin. Allow the gelatin to soak for two minutes, then heat over very low heat, stirring constantly, until the gelatin is fully dissolved (about 5 minutes).

Remove from heat and add the gin and Champagne, stirring well to blend. Pour into a very lightly greased loaf pan and chill until fully set, several hours or overnight.

Turn out the set gelatin onto parchment paper, then slice carefully (a thin knife works best) into rectangles or squares.

Garnish with edible gold leaf using a paintbrush (use one you can reserve for food only — you don’t want paint chemicals in your food!). Gold leaf crumbles and sticks to things (like fingers!) easily, so be gentle — just pull off tiny corners with the brush (they will stick), then place them gently on top of the gelée squares.

*If you don’t have simple syrup here is a simple easy recipe. In a small sauce pan over medium high heat, add 1 cup of sugar and 1 cup water. Bring it to a simmer. Watch it closely for roughly 5 minutes until it has a syrupy consistency.

champagne-jello-shots-colleen-jeffers-10

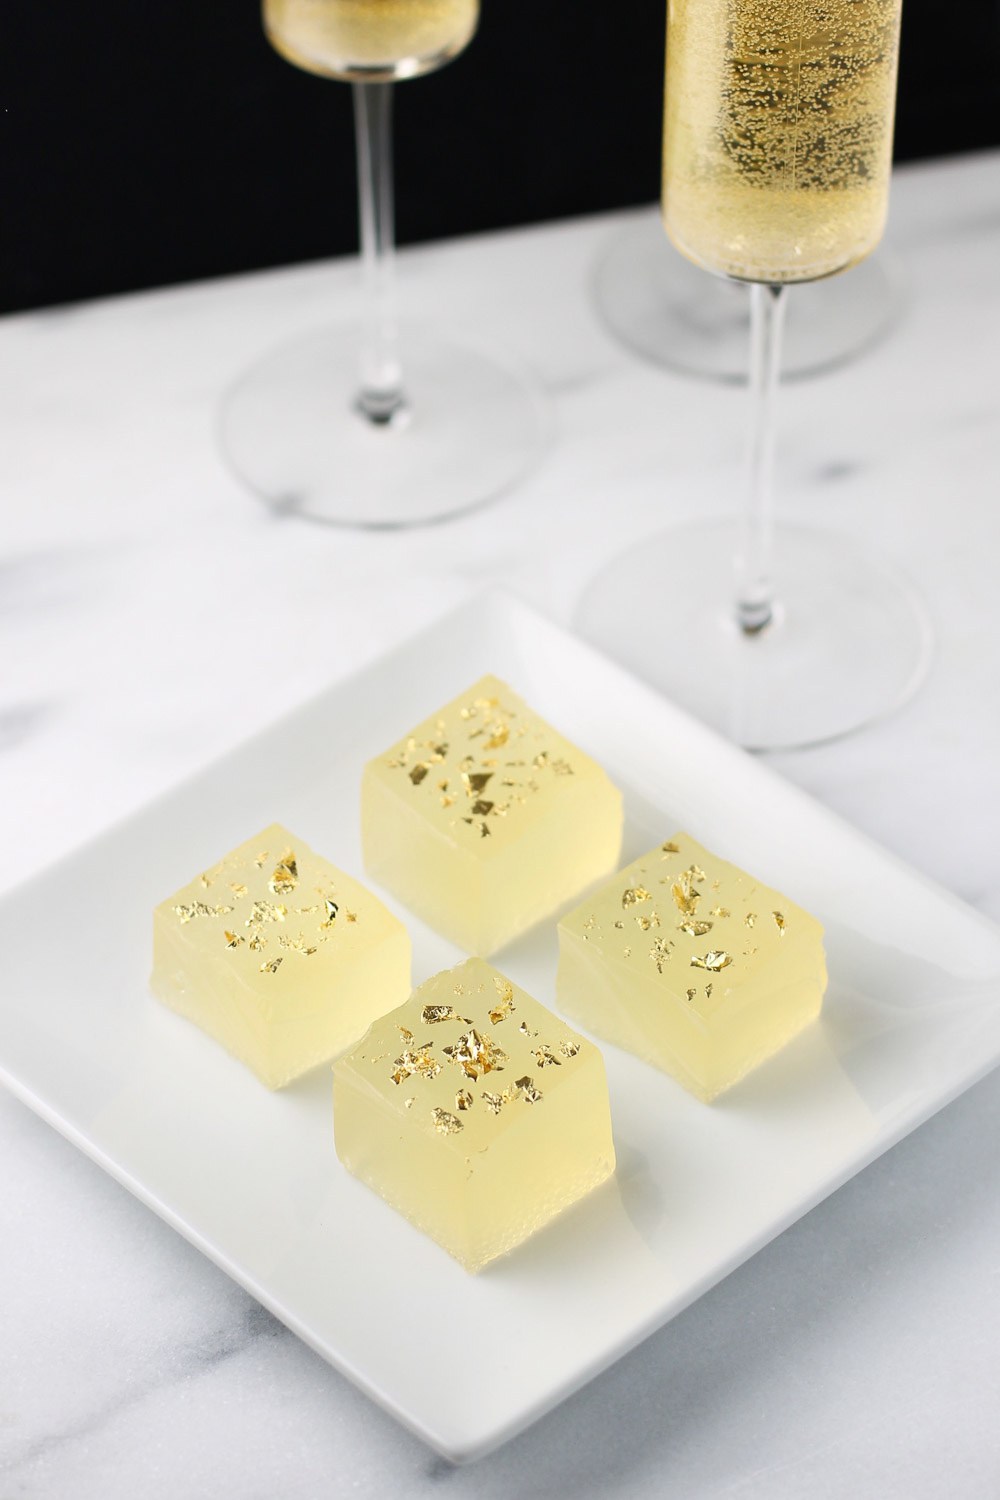
*Photo: Sugar and Cloth

Happy Eating (and Happy New Years’!), XO.

The 5 minute cake

OK So, it obviously still has to bake, butttttt it only takes 5 minutes to prepare or make (no lie). It’s yummy and if you’re in a pinch it’s a lovely dessert. PS our birthdays were last week so we are still in a sugary coma of cake cake cake [ahh the Rihanna song will NEVER get old, just like us by the way, never aging :)]

Anyway, take all of the ingredients below, mix well and bake for 25-30 minutes at 350 degrees, it’s literally THAT easy. My foodie tip would be to serve with cherry preserves, compote, jam whatever you can find. I just think cherries and almonds should be married so it’s like the most yum pairing ever! Having said that, the cake on its own is pretty divine

  • 2 eggs
  • 1/2 cup of melted butter
  • 1 cup flour
  • 2 tsp. almond extract
  • 1 cup sugar
  • sliced almonds (just to sprinkle on top pre-baking, to let people know its an almond cake).
  • powdered sugar (just to sprinkle on top post-baking, it makes it look not so easy & more fancy)

5 minute cake_damndelish

Happy Eating, XO.

Almond Biscotti

As I sat down to write this post I remembered, “Oh yeah, I should grab some of this biscotti I have leftover in the fridge.” This is the third batch I’ve made in two weeks…

The first time I made this biscotti I tested it on my family and it was gone in two days, followed by threats that they needed more asap. The second time, I made it for my husband and myself to make sure I could make it just as good. I did. It was. The third time I made it as a gift. I obviously became confident in it quickly. All I’m saying guys, is that this recipe is versatile. You can make it for anyone, for any occasion and it will be amazing no matter what.

  • 1 1/4 cups whole almonds, no salt
  • 1 3/4 cups flour
  • 2 tsp baking powder
  • 1/4 tsp salt
  • 2 large eggs, plus 1 large white beaten with pinch salt
  • 1 cup sugar
  • 4 tbsp unsalted butter, melted
  • 1 1/2 tsp almond extract
  • 1/2 tsp vanilla extract
  • Oil spray

This is going to seem like a ton of steps, but I promise, once you make it once, you won’t forget how to do it.

Preheat oven to 375. Pulse 1 cup of almonds in a food processor until finely ground, place in a bowl and set aside. Pulse the remaining 1/4 cup into roughly chopped chunks and also set aside in a bowl. Again in the processor, combine the flour, baking powder, and salt and transfer to a bowl. (Yes, you’ll need a lot of bowls, and yes, the food processor is your best friend for this recipe.)

“Scramble” the eggs in the processor until they’ve lightened and almost doubled in volume. While the eggs are being scrambled, slowly add sugar until thoroughly combined, as well as the melted butter, almond extract, and vanilla. Transfer egg mixture to medium bowl. Sprinkle half of flour mixture over egg mixture and gently fold until just combined. Add the ground and chopped almonds. Fold in remaining flour until a dough begins to form.

At this point you can either refrigerate the dough for a couple of hours, or bake right away. When you’re ready to bake, separate the dough into two rectangles, flattening them slightly to roughly 2″ high. Coat the spatula with a little bit of oil and smooth over the loaves. Beat the egg white until foamy, then brush on top of the two loaves to give them a crisp finish.

Bake the loaves for 25 minutes. They’ll begin to crack on the top. At this point, take them out of the oven and let them cool for 30 minutes. Before putting them back in the oven, slice them on an angle roughly 1″ thick. Lay the slices on their side and bake for the last 30 minutes until golden brown.

Biscotti


Happy Eating, XO.

Pound Cake even pickey eaters will love

We are smack dab in the middle of strawberry season and I couldn’t be happier. These plump red berries are one of my favorites, so I’m definitely taking advantage of them. Their freshness balances perfectly with sweet pound cake and the tartness of the balsamic vinegar. This dessert is sure to please everyone.

Fun fact: Pound cake gets it name because you use one pound each of flour, sugar, eggs, and butter. I’ve slightly modified that (let’s be honest, that’s a LOT of sugar and butter), but it’s still just as good!

Pound cake

  • 3 tsp baking powder
  • 3 cup flour
  • Dash of salt
  • 2 1/2 cups sugar
  • 3 sticks unsalted butter (room temperature)
  • 6 medium
  • eggs2 tsp vanilla extract
  • 3/4 cup milk

Whipped cream & Balsamic

  • Heavy whipping cream, chilled
  • 1/4 cup sugar
  • 1/4 cup balsamic vinegar (chocolate balsamic vinegar is also AH-MAZING with this)

Preheat oven to 325 degrees. Grease a bread pan then sprinkle with flour to prevent sticking. Whisk together the baking powder, flour, and salt. In a separate mixing bowl, mix together the sugar and butter until light and fluffy. Add eggs one at a time, then add the vanilla extract and milk.

Gradually add the flour mixture until fully combined. Pour the batter into the bread pan and bake for roughly an hour and 10 minutes, until a toothpick comes out clean. (If the top looks like it’s browning too fast, cover it with tin foil. Thanks for the tip Martha Stewart!)

While the cake is baking, combine the cream and sugar and begin whisking on high speed for 5 minutes, or until a fluffy consistency forms. (Or just use Cool Whip!).

When the cake is done, let it cool in the pan for 10 minutes before cutting. To serve, slice the cake, top with strawberries and a dollop of whipped cream. Hollow out the middle of the whipped cream and pour in the balsamic. Ta da!

Pound Cake

Happy Eating, XO.

Lemon Basil Sorbet

Happy Memorial day!! Although the official first day of summer is still a couple of weeks away, we’re prepping you by giving you a “cool” homemade dessert. I went on vacation to Florida back in April (while, somehow, it was still freezing in the Northeast) and I saw lemon basil sorbet on a menu. I’ll take two, please. Of course, I had to come home and try to make it for myself. I’m a real sucker for herbs in anything – cocktails, desserts,  facewash. No joke.  Plus, how hard could it be to make a glorified icee?

*If you’re using an ice cream maker like I did, don’t forget to freeze it overnight before making this recipe. If you don’t have an ice cream maker, don’t worry, you can still make this!

  •  3 cups of water
  • 1 cup sugar
  • 1 cup large basil leaves
  • 1 cup of lemon juice
  • 2 tbsp lemon zest

Combine the water and sugar in a small saucepan and bring to a boil. When fully combined, turn off the heat, throw in all of the basil and let it steep for 10 minutes.  This will create a basil syrup. Once cooled, strain out the basil leaves and add in the lemon juice and lemon zest. (Not gonna lie, throw in some vodka and this could be an awesome cocktail!) Hook up your frozen ice maker and slowly pour in the lemon basil syrup creating an icee/sorbet consistency. If you don’t have an ice cream maker, pour it in to an airtight container and store in the freezer, scraping it with a fork every hour until you get that sorbet consistency.

You can store this in an airtight container for up to three months.

Lemon Basil Sorbet


Happy Eating, XO.