Cold Brew Coffee (with Cardamom!)

In honor of International Coffee Day yesterday, we’re bringing you an international coffee recipe!

I’m sure by now you’ve heard of cold brew coffee. Especially now that Starbucks has started featuring it. For those of you who aren’t sure about it: No, it’s not cold coffee. You can still drink it hot. Yes, it’s so much more delicious, flavorful and fresh than regular brewed. No, you don’t have to use it all at once. It can stay in the fridge for up to two weeks. Yes, it gives you an excuse to use one of your cute mason jars for real (and not just decoration).

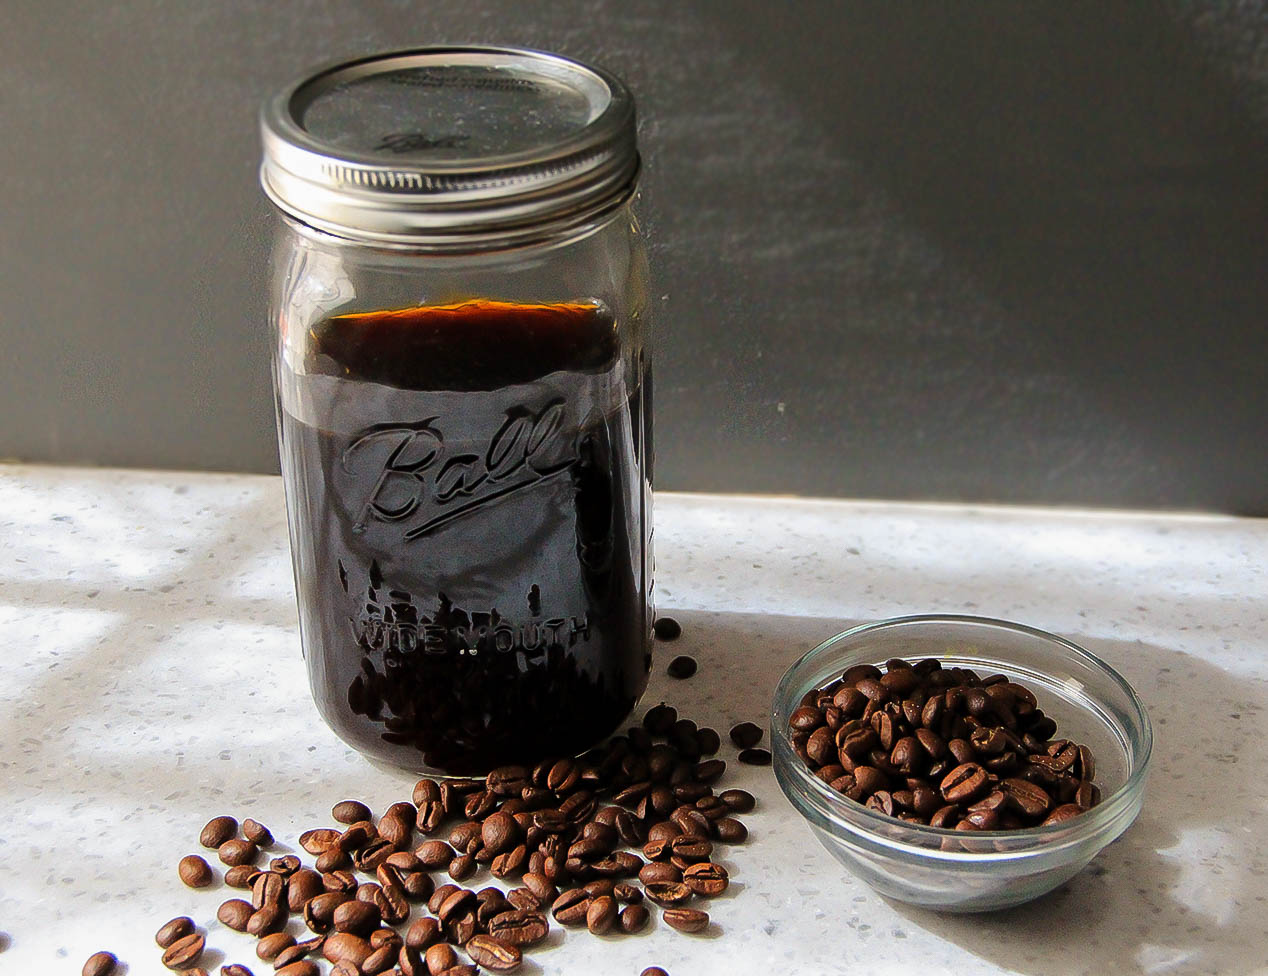
My British friend (told you this would be international) recently introduced me to this British fellow, Mike Cooper, after discussing homemade cold brew coffee. I thought I needed huge special equipment and my own goddamn coffee tree to make cold brew. But therein lies the beauty – you only need a bowl and a strainer. (Oh, and that cute mason jar.) That’s it. However, I will warn you – it does take about 24 hours to make, but it’s well worth the wait. Trust.

  • 2 cups fresh coffee grinds
  • 4 cups filtered water
  • 1/4 cup cardmom pods (optional)*
  • Paper towel or a sieve

In a large bowl, pour in the coffee grinds and water. *If you’re making cardamom coffee, mix in the pods. Cover it with a tea towel and place in the fridge. Our British fellow says to leave it for 20 hours but I’ve been doing between 24-28. You’ll see a nice foam at the top when you take it out.

After the wait is finally over, you’re going to strain the grinds. If you’re using a sieve, strain the coffee into a medium sized bowl. Once strained, covered another bowl with the paper towel and pour the coffee over it.

If you’re using paper towel, you’ve already cut to the second part and will only need to strain once. Cover a medium sized bowl with the paper towel and pour the coffee over slowly, letting it strain through.

At this point the coffee is really concentrated, but it gives you the freedom to choose how strong you want your cup to be. Pour a little coffee into a cup, and using piping hot water (or cold for iced coffee) fill it to your liking. If you’re a big fan of iced coffee like my husband, you can also use the concentrate to make a few iced cubes for next time.

cold-brew-coffee


Happy Drinking, XO.

Foodie Fave: Butternut Squash Galette

There’s just something about these galettes – we can’t get enough of them! Probably because they’re so damn easy to make (and eat). And because you can fill them with whatever your little heart desires. We found this savory gem of a galette on Matt Bites. It’s perfect for brunch, a quick lunch, or a cute app at a dinner party. (And how gorge are his pictures?! #goals). 

Dough:

  • 1 1/4 cups all-purpose flour
  • Pinch salt
  • 8 tablespoons (1 stick) cold unsalted butter, diced
  • 1 large egg, lightly beaten

Filling:

  • 1 large baking apple, such as Rome Beauty or Cortland
  • 1 small or 1/2 medium butternut squash (about 3/4 pounds), halved, seeded, and skin on
  • 1 small yellow onion, peeled, root end trimmed but intact
  • 3 tablespoons unsalted butter, melted
  • 2 teaspoons chopped fresh rosemary leaves
  • 2 teaspoons chopped fresh thyme leaves
  • Kosher salt and freshly ground black pepper
  • 2 tablespoons whole-grain mustard
  • 1/3 cup crumbled Stilton or other blue cheese (about 1 1/2 ounces)

For the dough: Pulse the flour and salt together in a food processor. Add the butter and pulse about 10 times until the mixture resembles coarse cornmeal with a few bean-size bits of butter in it. Add the egg and pulse 1 to 2 times more; don’t let the dough form a mass around the blade. If the dough seems very dry, add up to 1 tablespoon of cold water, 1 teaspoon at a time, and pulsing briefly. Remove the blade and bring the dough together by hand. Shape the dough into a disk, wrap it in plastic wrap, and refrigerate at least 1 hour.

For the filling: Halve and core the apple. Cut each 1/2 into 8 wedges and put them in a large bowl. Slice the squash and cut the onion into wedges so that both are as thick as the apple wedges, and add them to the apples. Add the butter, rosemary, and thyme and toss gently to combine. Season with salt and pepper and toss again.

Preheat the oven to 400 degrees F.

Roll the dough on a lightly floured surface into a 12-inch disk. Transfer the dough to a baking sheet and brush with mustard. Starting 2 inches from the edge, casually alternate pieces of apple, squash, and onion in overlapping circles—if you have extra pieces of one or another, tuck them in where you can or double them up until to use all the filling. Fold and pleat the dough over the edge of the filling. Bake until the crust is brown and the apples, squash, and onions are tender and caramelized, about 55 minutes. Scatter the cheese over the filling and bake until melted, about 5 minutes more. Cool the galette briefly on a wire rack. Cut into wedges and serve.

GALETTE_550px

Happy Eating, XO.

Pop It Like It’s Hot – Popovers

Remember how we told you in our challah recipe that making bread isn’t actually that daunting? Well, it still isn’t! And these pop-overs are proof of that. I whipped them together as a side and they were the perfect puffy compliment to our dinner. Also, because the steam “pops” the middle of them, it leaves room for you to get creative. Fill them with custard, berries, steak tips and sauce. (What?! Yes, go with me on this one. Think: Ghetto beef wellington.). These little guys are so versatile you can use them as a side dish, at brunch, or as a dessert. Also, bonus, you don’t actually need a pop-over pan. I’m all about having an excuse to buy another kitchen gadget or pan, but a muffin tin works just as well.

  • 1 cup flour
  • 1 tsp salt
  • 3/4 whole milk
  • 4 eggs, room temperature
  • 2 tbsp melted butter

Preheat the oven to 425 and swipe your muffin tin with butter. Place it in the oven while it preheats. It’s best to use a hot tin to create steam when the batter hits it. In a mixing bowl, combine all of the ingredients and whisk until smooth. The batter will be pretty liquid-y, you don’t want it to be thick.

Take the hot tin out and pour in the batter. Bake for roughly 20 minutes and whatever you do, please don’t open the oven to check on them! They won’t get to their full puffed up glory if cool air hits them before they have a chance to crisp on the outside. Enjoy them hot or store them in an airtight container for up to 3 days.

Popovers

Happy Eating, XO.

The Fresh French Baguette

Ok, guys. It’s high time we start taking it up a notch by making our own bread, a baguette to be exact. I can’t tell you how helpful this has been when throwing parties. Make a quick baguette (you don’t have to wait hours for this one to rise. It takes roughly an hour for prep and baking), bake it and cut it up. You can use the recipes we gave you for crostini, or toast, or go crazy with your own toppings! Whatever your heart desires. Sayonara store bought bread.

  • 1 1/2 cups lukewarm water
  • 1 tsp active dry yeast (Told you you’d use all of the yeast eventually)
  • 3 cups all-purpose flour
  • 1 tsp salt
  • **1 egg white wash (optional)

In a mixing bowl, combine the lukewarm water with the yeast. Whisk together then let it sit for roughly 10 minutes. Using a dough hook on slow speed, add all of the salt, and begin adding in the flour 1 cup at a time. If you don’t have a dough hook, you can mix together with a whisk or spatula. You should begin to see a soft dough form. If it’s still too wet and sticky, add a bit more flour. Take the dough out of the bowl and place on a floured surface. Let it sit for 5 minutes. (Sorry guys, I know this is a test of patience. I usually go wash the dishes I just used. Two birds, one stone.)

Preheat the oven to 170 degrees, and grease a cookie sheet or baguette pan. Using a greased knife, cut the dough in half and roll it out into a log/baguette. **If you want a crispy crust, whisk the egg white and brush on top of the dough.  Place the dough on the sheet or pan, and make 3 small, even slits across the top of each baguette. Bake for 15 minutes. Leaving the dough in the oven, turn it up to 400 degrees for another 15 minutes. Then turn the oven down to 350 for another 10 minutes.

Damndelish French Baguette

Happy Eating, XO.


Strawberry Peach Mini Muffins

It’s peach season people. And what better way to eat peaches than with another summer favorite – strawberries! (Ok, we think our peaches and cream and peach cobbler recipes are pretty awesome too. FINE, we’re obsessed with peaches.) Aaanyway, I picked these juicy fruits up from our local farmers’ market over the weekend. I absolutely adore going to farmers’ markets and I’m lucky enough to say I have a handful of them all within 15 minutes away. The fact that I can get fresh fruits and veggies means endless recipe options, for us and you. Saweet! And if you go a little overboard with too many fruits and veggies, before they start turning, throw them in to muffins like these little guys.

These mini muffins are perfect for brunch or as dessert. And, warning: they’re super poppable. You may run out sooner than you think.

Cue Presidents of the United States

*Makes 24 mini muffins

  • 2 eggs
  • 1/4 cup unsalted butter, melted
  • 2 cups all-purpose flour
  • 1 tbsp baking powder
  • 3/4 cup sugar
  • 1 tsp vanilla extract
  • 1/2 tsp almond extract
  • 1 cup chopped strawberries
  • 1 cup chopped peaches

Preheat the oven to 350 degrees and grease a mini muffin pan. In a mixing bowl, combine the dry ingredients: baking powder, flour, and sugar until fully blended. Stir in the eggs, both extracts, and the butter. You should begin to see a dough form. When fully combined, gently fold in the strawberries and peaches. Pour into the pan, filling each muffin to 3/4 high. Bake for 20 minutes or until the tops are golden brown.

Strawberry peach mini muffins DamnDelish

Happy Eating, XO.