Grilled Artichokes

If you’re an East coaster like we are, I’m sure you headed outside last Sunday and stuck your face to the sun to soak up the warmest day we’ve had all year! I didn’t throw on my bathing suit just yet, but I did break out the flip flops and fired up the grill. (And popped open a bottle of Pinot Grigio, of course…).

Grilled veggies are one of my favorite sides, so I took advantage of the beautiful sunny day and grilled some artichokes. If it’s still too cold where you are (I heard Michigan got 8″ of snow last week?! Our condolences…) you can also roast them like we mention in our Eat Your Vegetables post.

  • 2 artichokes, cut in half down the middle
  • 3 garlic cloves, chopped
  • 3 tbsp of olive oil (enough for coating the artichokes)
  • 2 tsp of garlic salt or Adobo
  • 1 tsp of  parsley (dried or fresh)

Fill a pot with enough water to cover the artichokes, or use with a steamer. While the water is boiling, drop in the garlic cloves to infuse the artichokes with a bit of the flavor. Boil or steam for about 20 minutes. In the meantime, mix together the olive oil, 1 tsp of the garlic salt and parsley.

When the artichokes are done, coat them well with the olive oil mixture. Place them on a hot grill flat side down and sprinkle with the remaining 1 tsp of garlic salt. Grill each side for 8-10 minutes. They go great with our Sherry Vinegar Hanger Steak or Omega 3.

Grilled artichokes


Happy Eating, XO.

Squash It

I have a fellow foodie that is just my spirit animal when it comes to trying new dishes and eating out together. Not only is she just as adventurous as me, but she is a phenomenal cook. One day when we were discussing different recipes we both came to the conclusion that we are obsessed with autumn vegetables and summer fruits. Those are the best seasons for the respective produce and you should go crazy making dishes that incorporate those seasonal ingredients. Now I know I am a long shot away from Fall, but with the recent flurries we experienced in the Philadelphia area, it sure feels more like autumn than spring. Check out this lovely butternut squash (one of the shining stars of the Fall veggie scene) recipe, it even re-uses the maple syrup you bought for this chicken recipe and the squash from the Fall Stew. Plus, eating it should help me “squash” my feelings of missing Fall. Oh what a wordsmith I can be.

  • 1 package of the pre-peeled and cubed butternut squash from Trader Joes (I am obsessed with TJ and lazy, perfect combo).
  • 1 tbsp. of olive oil
  • 1 tbsp. of the maple syrup
  • 1/2 tsp. of cinnamon
  • 1/4 tsp. of cayenne (although I did equal parts of cinnamon & cayenne, since I like the heat)
  • 1 tsp. of course sea salt
  • Optional: 2 tbsp. low fat sour cream & 1 tsp. chopped fresh chives.

Set the oven at 400 degrees and toss the ingredients with the squash. Spread out on baking sheet and cook for 20-30 minutes. I do the fork test and prick the larger piece to check for done-ness. If it slides out and the squash is soft, you can shut off the oven & let it cool. I also serve this with a dollop of cold low fat sour cream which I sprinkle with chopped chives. I adore the yummy mild onion flavor it adds to the dish. Plus any potato chip lover knows that sour cream can’t breath without onion/chives.

Happy Eating, XO.

Fall Stew

Guys, I miss football. I miss Fall. I mean if its going to be this cold I’d rather us be back in Fall than pretend to be in Spring. There aren’t any flowers, the showers are more like snow, and there just isn’t great spring food. I mean there is good Spring food, but not mouth watering great. Although I will say to stay tuned for an Easter Sunday themed blog post with yummy tea party sandwiches and snacks. (shameless blog plug) Anyway, point being I am going to eat like its still Fall and still can before summer comes around and I need sultry salads, fruits, and iced tea. Ok so back to this divine stew. I can’t even tell you how flipping good it is. There is this amaze balls Italian market near my work and not only do I get lunch from there AT LEAST 2x a week, but I always pick up tasty imported items from Italia whenever I can (aka last time I was there I picked up truffle butter AGAIN, whatever, Jess said we don’t judge here). Anyway, Tredici is the bomb.com for all the delish food they have on their regular menu, but they also have daily specials. This puppy was debuted in September and it made its way back once a month throughout the fall and I miss it so. I decided I must re-create it and have it available all year round. (or I’ll die, because I love it THAT much).  Ok melodramatics aside, I don’t think I can say I replicated the magical stew 100%, but this is pretty darn close, say 99.9% for all you math nerds. Anyway, it satiated my hankering for this delish stew and I hope it does the same for you! (ha “stew”, “you”, rhyming, happy camper, belly full).

  • 2 tbsp. of olive oil
  • 12 oz. hot Italian sausage, cut into small chunks (I just did droppings of the sausage by cutting out the casing, that lets the stew grab on to all the spices of the sausage).
  • 12 cipollini onions peeled (pearl onions can be substituted)
  • 1 ½ cups crushed tomatoes (Cento is my fav canned brand)
  • 3 cups low-sodium chicken stock
  • ½-oz bundle of herbs, such as rosemary, thyme, sage or oregano (there is a trio packet that’s sold at my grocery store, saves time & money so I just used that. It was parsley, thyme, and oregano)
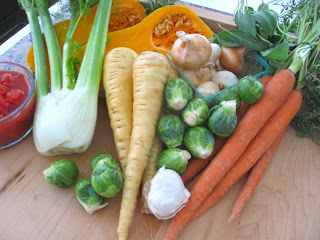
  • 1-  2 ½ pound butternut squash, peeled, seeded, cut into 1-inch chunks (again I buy the pre-prepared stuff from Trader Joe’s)
  • 3 carrots, peeled and cut into ½ inch pieces (I hate cooked carrots but I left them in and just fished them out so I could get the flavor but not have to eat them. I know I am a child).
  • 3 parsnips, peeled and cut into 2-inch long sticks
  • 1 fennel bulb, trimmed and cut in half
  • 12-15 Brussels sprouts, trimmed and cut in half
  • 2 tsp. salt
  • 1/8 tsp. freshly ground pepper

Fall Stew

Heat oil in pan over medium heat. Add sausage, stirring until the sausage breaks into small pieces and is no longer pink, about 10 minutes. Remove with a slotted spoon, set aside. Raise heat to medium high, add onions. Then cook, stirring until golden, 5 to 6 minutes. (At this point, I put the sausage and onions in the slow cooker and added the remaining ingredients. Stir to mx.)Add tomatoes, stock, and herbs. Simmer over medium heat until liquid starts to thicken, 20 to 25 minutes. Add sausage back and the squash, carrots, parsnips, and fennel. Cover and simmer until vegetables are tender, about 10 minutes.  Add Brussels sprouts now and cook, covered about 5 minutes more. (or cook on high in the slow cooker for 4-5 hours if not doing it stove top). Remove cover, and cook, stirring occasionally, until liquid thickens, 10 to 15 minutes more. Adjust seasonings and serve warm. This will serve 4 – 6 people based on if you are making this a meal or a 1st course.

Happy Eating, XO

The “good for you” fries

I don’t know about all of you, but with the amazing weather we had the other day it made me realize how close summer, and bathing suit, season is! [Insert expletive here.] Because of that, I’ve been trying desperately to come up with some healthy alternatives, ie. these “good for you fries” – green bean fries. Thank god they’re much healthier, because guys, these came out better than real fries! #addicted (Bonus: I didn’t use all of the green beans I bought, so I used the remaining fresh beans with some hummus. Delish!)

  • 1lb fresh green beans (ends snapped off)
  • 1/4 cup olive oil
  • 1 tsp of salt and pepper
  • 1 pinch of paprika
  • 1/2 cup grated or shredded Parmesan cheese (Save a few pinches to top off the fries)

Preheat the oven to 375 degrees and line a baking sheet with foil or parchment paper. Mix together the oil, salt, pepper, paprika and cheese. Toss in the beans and coat completely. Spread out on the baking sheet and sprinkle a little extra cheese on top. Bake for 15-20 minutes/until brown and crispy.

I served this with a sherry vinegar hanger steak (recipe coming soon from one of our awesome contributors!).

Parm green beans

Happy Eating, XO

SXSW

Guys, we need to stop having #fomo just because we aren’t in Austin. I re-created the feel of being down there by coming up with these sumptuous lil appetizers. You know because us grown ups have people over for drinks and apps on the weekends. Anyway, I went real southwestern with my home-made corn cakes, topped with spicy andouille chicken sausage & a dollop of my avocado sauce. It was sweet, spicy, creamy, crunchy, and filling. Everything you’d want to coat your stomach with before a night of cocktails. Plus, if you drink enough it will be way easier to pretend like your actually at SXSW.

  • 1 can of creamed corn (400 grams)
  • 2 cups of de frosted frozen corn
  • 2 eggs
  • 1 1/2 cups grated cheddar (I suggest sharp since its more flavorful, but go with whatever you have aka I may have just used leftover Mexican blend from fajita night, don’t judge)
  • 1/2 of a red bell pepper chopped small (should be around the same size of the corn kernels).
  • 1 tsp of baking powder
  • 1 1/2 cups of all purpose flower
  • 1/2 cup of milk
  • 2 tsp. smoked paprika
  • 1 tsp. cayenne pepper
  • 2 tsp. garlic powder
  • 1 tsp. dried parsley flakes
  • 2 tsp. onion powder (I would even say thinly sliced green onion would be fab for this recipe, but I had to improvise with what was in my pantry. I am trying it with that next time though because this is a definite repeat dish).
  • salt & pepper to taste

Mix the creamed corn, eggs, chopped red pepper, corn, baking soda, flour, and milk. Then fold in the spices & cheese. Then in a sauté pan heat vegetable oil at medium to high heat (you don’t want to scorch the corn cakes, but if the oil isn’t hot enough you wont get a nice crisp on the cakes). Use a large tablespoon to measure out the corn cake mixture evenly in the pan. Meanwhile, I sliced the store bought sausage and threw it in the oven at 350 degrees to roast & crisp up as I made the corn cakes. I’d say about 10-15 minutes (but mine were fully cooked, in case yours are raw increase the cooking time to 20-25 minutes or when browned). Fry spoonfuls of the batter until bubbles appear at the top & flip (like you would do with pancakes).  Allow to cook on the other side and then in a paper towel lined platter, cool the corncakes so the excess oil is absorbed. No one wants to be able to taste the grease, but they do want crispy & yummy corncakes. The batter should make about 15 corn cakes (varies based on size). Layer with a slice of the warm sausage and a cold dollop of the avocado sauce. Nosh your face off.

photo

Happy Eating, XO.