3S Cauliflower: Sweet Smokey & Spicy

All of you can stop whining about how I am this evil person for making you buy pure maple syrup for a previous chicken recipe and how I haven’t given you more recipes to cook with it. I am here to save your expensive maple bottle and put it to good, nay great use! As you know I am a huge fan of the sweet and spicy combo, that was the flavor profile of the sassy fish recipe as well. So this recipe is near and dear to my taste buds. Also! It is my ALL TIME favorite way of cooking vegetables. Roasting is THE freaking BEST! I legit roast everything: Brussels sprouts, asparagus, zucchini, butternut squash, eggplant -sike I hate eggplant, but you could def roast it to make it suck less. Anywho, I love the charred flavor of the high heat and the simplicity of cooking so that it lets the actual veggie shine! See below for a 10 minute (And mind you 4 ingredient) side dish that will fancy up any meal you serve it with…

  • 1 head of cauliflower, cut into bite-sized pieces
  • 2 1/2 tablespoons olive oil
  • 1 1/2 tablespoons sriracha
  • 2 1/2 tablespoons maple syrup
  • Salt and pepper to taste.

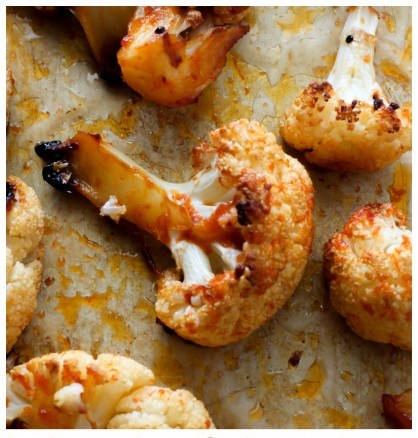
Preheat oven to 425°(F). Cut the cauliflower into bite-sized pieces; transfer to a large bowl; set aside. In a small bowl combine olive oil, sriracha, maple syrup, salt, and pepper. Pour the sriracha mixture over the cauliflower and mix well, making sure the cauliflower is well coated in the sauce. Spread the cauliflower onto a large baking sheet and bake for 20 minutes, stirring once at the half way point. Increase the oven temperature to 475 and bake for another 12 minutes, or until golden brown.

PicMonkey-Collage5-418x1024

Happy Eating, XO.

Sassy Fish

Hopefully everyone is full of chocolate from V-day and is now ready for eating better. As we know, fish is a staple to eating healthier, but I have a really a good twist on a basic pan seared fish recipe! I love it because its a lil sweet & spicy and I think it resonates with me/my personality. I’m a sassy girl! Overall I am sweet, but I have a lil fiery side to me as well. I also love this fish idea because it totally came out of no where when I was rummaging through my mom’s fridge over the holidays.

  • 2 5-6oz filets of a “meaty” fish (so think salmon, tuna, halibut and not tilapia or cod because they are more flaky)
  • 1 tbsp. minced garlic (3 cloves?)
  • 2 tbsp. minced onions (yellow, Spanish, shallots, whatever you want)
  • 1 tsp. sriracha (more if you like it spicier vs. sweeter)
  • 1 tbsp. olive oil
  • 1 tbsp. soy sauce
  • 3 tbsp. mango chutney (I use the brand Patak’s Major Grey Mango Chutney, but really any one would work)
  • Pinch of black pepper

In a small sauce saucepan simmer the chutney, soy, sriracha, garlic, and onions. This will not only marry all the flavors, but it will thin out the consistency since the chutney is chunky with pieces of mango in it. Think about 3-5 minutes. While that is happening coat the fish with olive oil and pepper (no salt really needed because of the sodium in the soy). Start to sear in a hot non-stick pan. Reduce the flame on the saute pan and add the sauce to the fish, finish cooking the filets with the sauce in pan. Approximately 10-12 min. of total cook time for fish.

Happy Eating, XO.

Ginger Beer & Dare I Say It….Tequila.

Listen, just because this is the 3rd drink post and 2nd consecutive one, doesn’t mean we are saying food isn’t important or that we all need to go on some liquid diet. Although, as hot as this summer is supposed to be…I am not opposed to it at all! Anyway, like many of my post grad peers I swore off tequila after college. Sure I developed a taste for some of the good stuff, but it still wasn’t my drink of choice. (Sidebar Jess and I are both huge café patron fans by the way. what’s not to love? espresso-yum, good alcohol-yum) Ok ok back to tequila in general and its redeeming qualities… As I was saying, if not consumed in copious amounts and as a shooter, it’s not half bad. I even found myself enjoying a tequila tasting with coworkers, sampling various flights of chocolate and chili undertones. So much so, that a colleague of mine even gave me a bottle of some very nice tequila for Christmas. Now what to do with it…I don’t particularly love margaritas or want to waste the time cleaning my blender so I just let it sit on bar for months until I was at my cousin’s and had this lovely little refreshing gem of a cocktail. Boy, I knew drinking and good taste ran in the family, but I was so pleasantly surprised by this drink that it became my poison of choice all summer long.

  • 4 ounces ginger beer
  • 2 ounces lime juice
  • 1 1/2 ounces tequila (She used patron silver, but any good quality tequila will work. It can be the gold stuff too, just please no Jose, cringe).
  • 1/2 ounce simple syrup (feel free to leave out, some people just need a little sweet to counterbalance the bold ginger & lime flavors, I do without it).
  • fresh limes for garnish
  • coarse salt for the rim (this isn’t just to look fancy, the salt compliments the ginger beer well).

The key to make these super delicious is to use frosty glasses! So a few hours (or the night) before, stick your glasses in the freezer. Before serving, rim the edge of the glass with a lime slice and then dip it in coarse salt to coat. Fill the glass with just a few ice cubes. Add the ginger beer, lime juice, tequila, and simple syrup to a shaker with ice and gently shake (you don’t want to lose the fizz of the ginger beer so one quick stir or shake is more than enough) to combine. Pour over ice and add to the glass an extra lime wedge for show. P/S we are not responsible for any hangovers these may cause, because it will be very hard to just have one!

Happy Drinking, XO.

Squash It

I have a fellow foodie that is just my spirit animal when it comes to trying new dishes and eating out together. Not only is she just as adventurous as me, but she is a phenomenal cook. One day when we were discussing different recipes we both came to the conclusion that we are obsessed with autumn vegetables and summer fruits. Those are the best seasons for the respective produce and you should go crazy making dishes that incorporate those seasonal ingredients. Now I know I am a long shot away from Fall, but with the recent flurries we experienced in the Philadelphia area, it sure feels more like autumn than spring. Check out this lovely butternut squash (one of the shining stars of the Fall veggie scene) recipe, it even re-uses the maple syrup you bought for this chicken recipe and the squash from the Fall Stew. Plus, eating it should help me “squash” my feelings of missing Fall. Oh what a wordsmith I can be.

  • 1 package of the pre-peeled and cubed butternut squash from Trader Joes (I am obsessed with TJ and lazy, perfect combo).
  • 1 tbsp. of olive oil
  • 1 tbsp. of the maple syrup
  • 1/2 tsp. of cinnamon
  • 1/4 tsp. of cayenne (although I did equal parts of cinnamon & cayenne, since I like the heat)
  • 1 tsp. of course sea salt
  • Optional: 2 tbsp. low fat sour cream & 1 tsp. chopped fresh chives.

Set the oven at 400 degrees and toss the ingredients with the squash. Spread out on baking sheet and cook for 20-30 minutes. I do the fork test and prick the larger piece to check for done-ness. If it slides out and the squash is soft, you can shut off the oven & let it cool. I also serve this with a dollop of cold low fat sour cream which I sprinkle with chopped chives. I adore the yummy mild onion flavor it adds to the dish. Plus any potato chip lover knows that sour cream can’t breath without onion/chives.

Happy Eating, XO.

I <3 You, Cupcakes

It’s no secret by now – I love food, and I especially love baking. So it’s only right this Valentine’s Day I bake some yummy cupcakes! Some people go for chocolate covered strawberries, I go for chocolate on chocolate cupcakes. #NoShame. I bought a chocolate mold a few years ago just for the hell of it (shout out to Michael’s!), and as it turns out it makes perfect little hearts for cupcake toppers!

Chocolate Heart Toppers

  • 1 cup melted white chocolate
  • 2-3 drops of red food coloring (add more or less depending on the color you want)

Chocolate Cupcakes

  • 1 cup all-purpose flour
  • 1⁄4 tsp baking soda
  • 2 tsp baking powder
  • 1 packet chocolate pudding powder (I replaced this with unsweetened cocoa powder bc, let’s be real, you’ll never use unsweetened cocoa for anything after this recipe.)
  • 1⁄8 tsp salt
  • 6 Tbsp butter, softened
  • 1 1⁄2 cup white sugar
  • 2 egg
  • 3⁄4 tsp vanilla extract
  • 1 cup milk

Icing

  • Pillsbury’s frosting in a can = no mess and just as good

Start on the chocolate hearts about an hour before hand so they have time to harden. Melt the white chocolate slowly in a sauce pan. Once it’s liquidy, add in the food coloring. (If it starts to score/harden after it’s already melted add a tiny bit of water to it and it will smooth right out again.) Pour in to the mold and stick in the freezer.

For the cupcakes, do the usual prep work: preheat the oven to 350 degrees and line the muffin pan with cupcake liners. Then sift together all of the flour, baking powder & soda, chocolate pudding powder, and salt.

In a separate bowl, mix together the butter and sugar until fluffy. Follow up with the eggs and vanilla. Then slowly add in the flour mixture and milk until completely combined. Bake for 15 minutes or until a toothpick comes out clean.

Valentine's Day cupcake

Happy Eating (and Valentines Day!), XO