Homemade Ice Cream

Remember that healthy kick I told you about in the green bean fries post? Well I’m still on it! But as you all probably know by now, I also have a real sweet tooth. I couldn’t stay away from it for long! The solution? Homemade ice cream. What’s even “sweeter” about this recipe is that it’s only three ingredients! (Get it?! Sorry…I can’t help myself sometimes.)

  • 2 Bananas
  • 1/2 cup of cocoa powder (I promise we’ll give you more recipes with cocoa powder in it since it’s probably not something you use very often.)
  • 3 spoonfuls of creamy peanut butter

Freeze the bananas for at least an hour (the longer you freeze them, the thicker the ice cream will be). When they’re “done” drop them in to a food processor or magic bullet (the thing for food people!), along with the peanut butter. Once the bananas and PB are blended, slowly mix in the cocoa powder.

I suggest serving it immediately. But if you have leftovers like I did (score!), you can store them in the freezer for later. I put them in individual cups so I could “grab them and go”.

Homemade Ice Cream

Happy Eating, XO

The “good for you” fries

I don’t know about all of you, but with the amazing weather we had the other day it made me realize how close summer, and bathing suit, season is! [Insert expletive here.] Because of that, I’ve been trying desperately to come up with some healthy alternatives, ie. these “good for you fries” – green bean fries. Thank god they’re much healthier, because guys, these came out better than real fries! #addicted (Bonus: I didn’t use all of the green beans I bought, so I used the remaining fresh beans with some hummus. Delish!)

  • 1lb fresh green beans (ends snapped off)
  • 1/4 cup olive oil
  • 1 tsp of salt and pepper
  • 1 pinch of paprika
  • 1/2 cup grated or shredded Parmesan cheese (Save a few pinches to top off the fries)

Preheat the oven to 375 degrees and line a baking sheet with foil or parchment paper. Mix together the oil, salt, pepper, paprika and cheese. Toss in the beans and coat completely. Spread out on the baking sheet and sprinkle a little extra cheese on top. Bake for 15-20 minutes/until brown and crispy.

I served this with a sherry vinegar hanger steak (recipe coming soon from one of our awesome contributors!).

Parm green beans

Happy Eating, XO

Winner, Winner, Chicken Dinner

I mean this honestly, this dinner is a real winner. It’s super simple, tasty, and gives you leftovers. It also gives you an excuse to use up all of that chicken that’s been sitting in your freezer. (Does anyone else always seem to have chicken in their freezer or is that just me?) It takes a little while to cook (45 minutes – an hour), but it’s worth the wait for this yummy, hearty dinner.

  • 3-4 boneless chicken breasts
  • 4 tomatoes, cubed
  • 1 large can of artichoke hearts
  • Salt & pepper to taste
  • 1 cup mozzarella

Preheat the oven to 350 degrees and place the chicken in an oven safe dish. Mix the tomatoes, artichoke hearts, and salt and pepper together and pour over the chicken. Bake in the oven for 45 minutes to an hour. A few minutes before it’s done, sprinkle with mozzarella and let it melt. If you have it, you can also sprinkle chopped basil to give it a fancier presentation.

Chicken bake

Happy Eating, XO.

SXSW

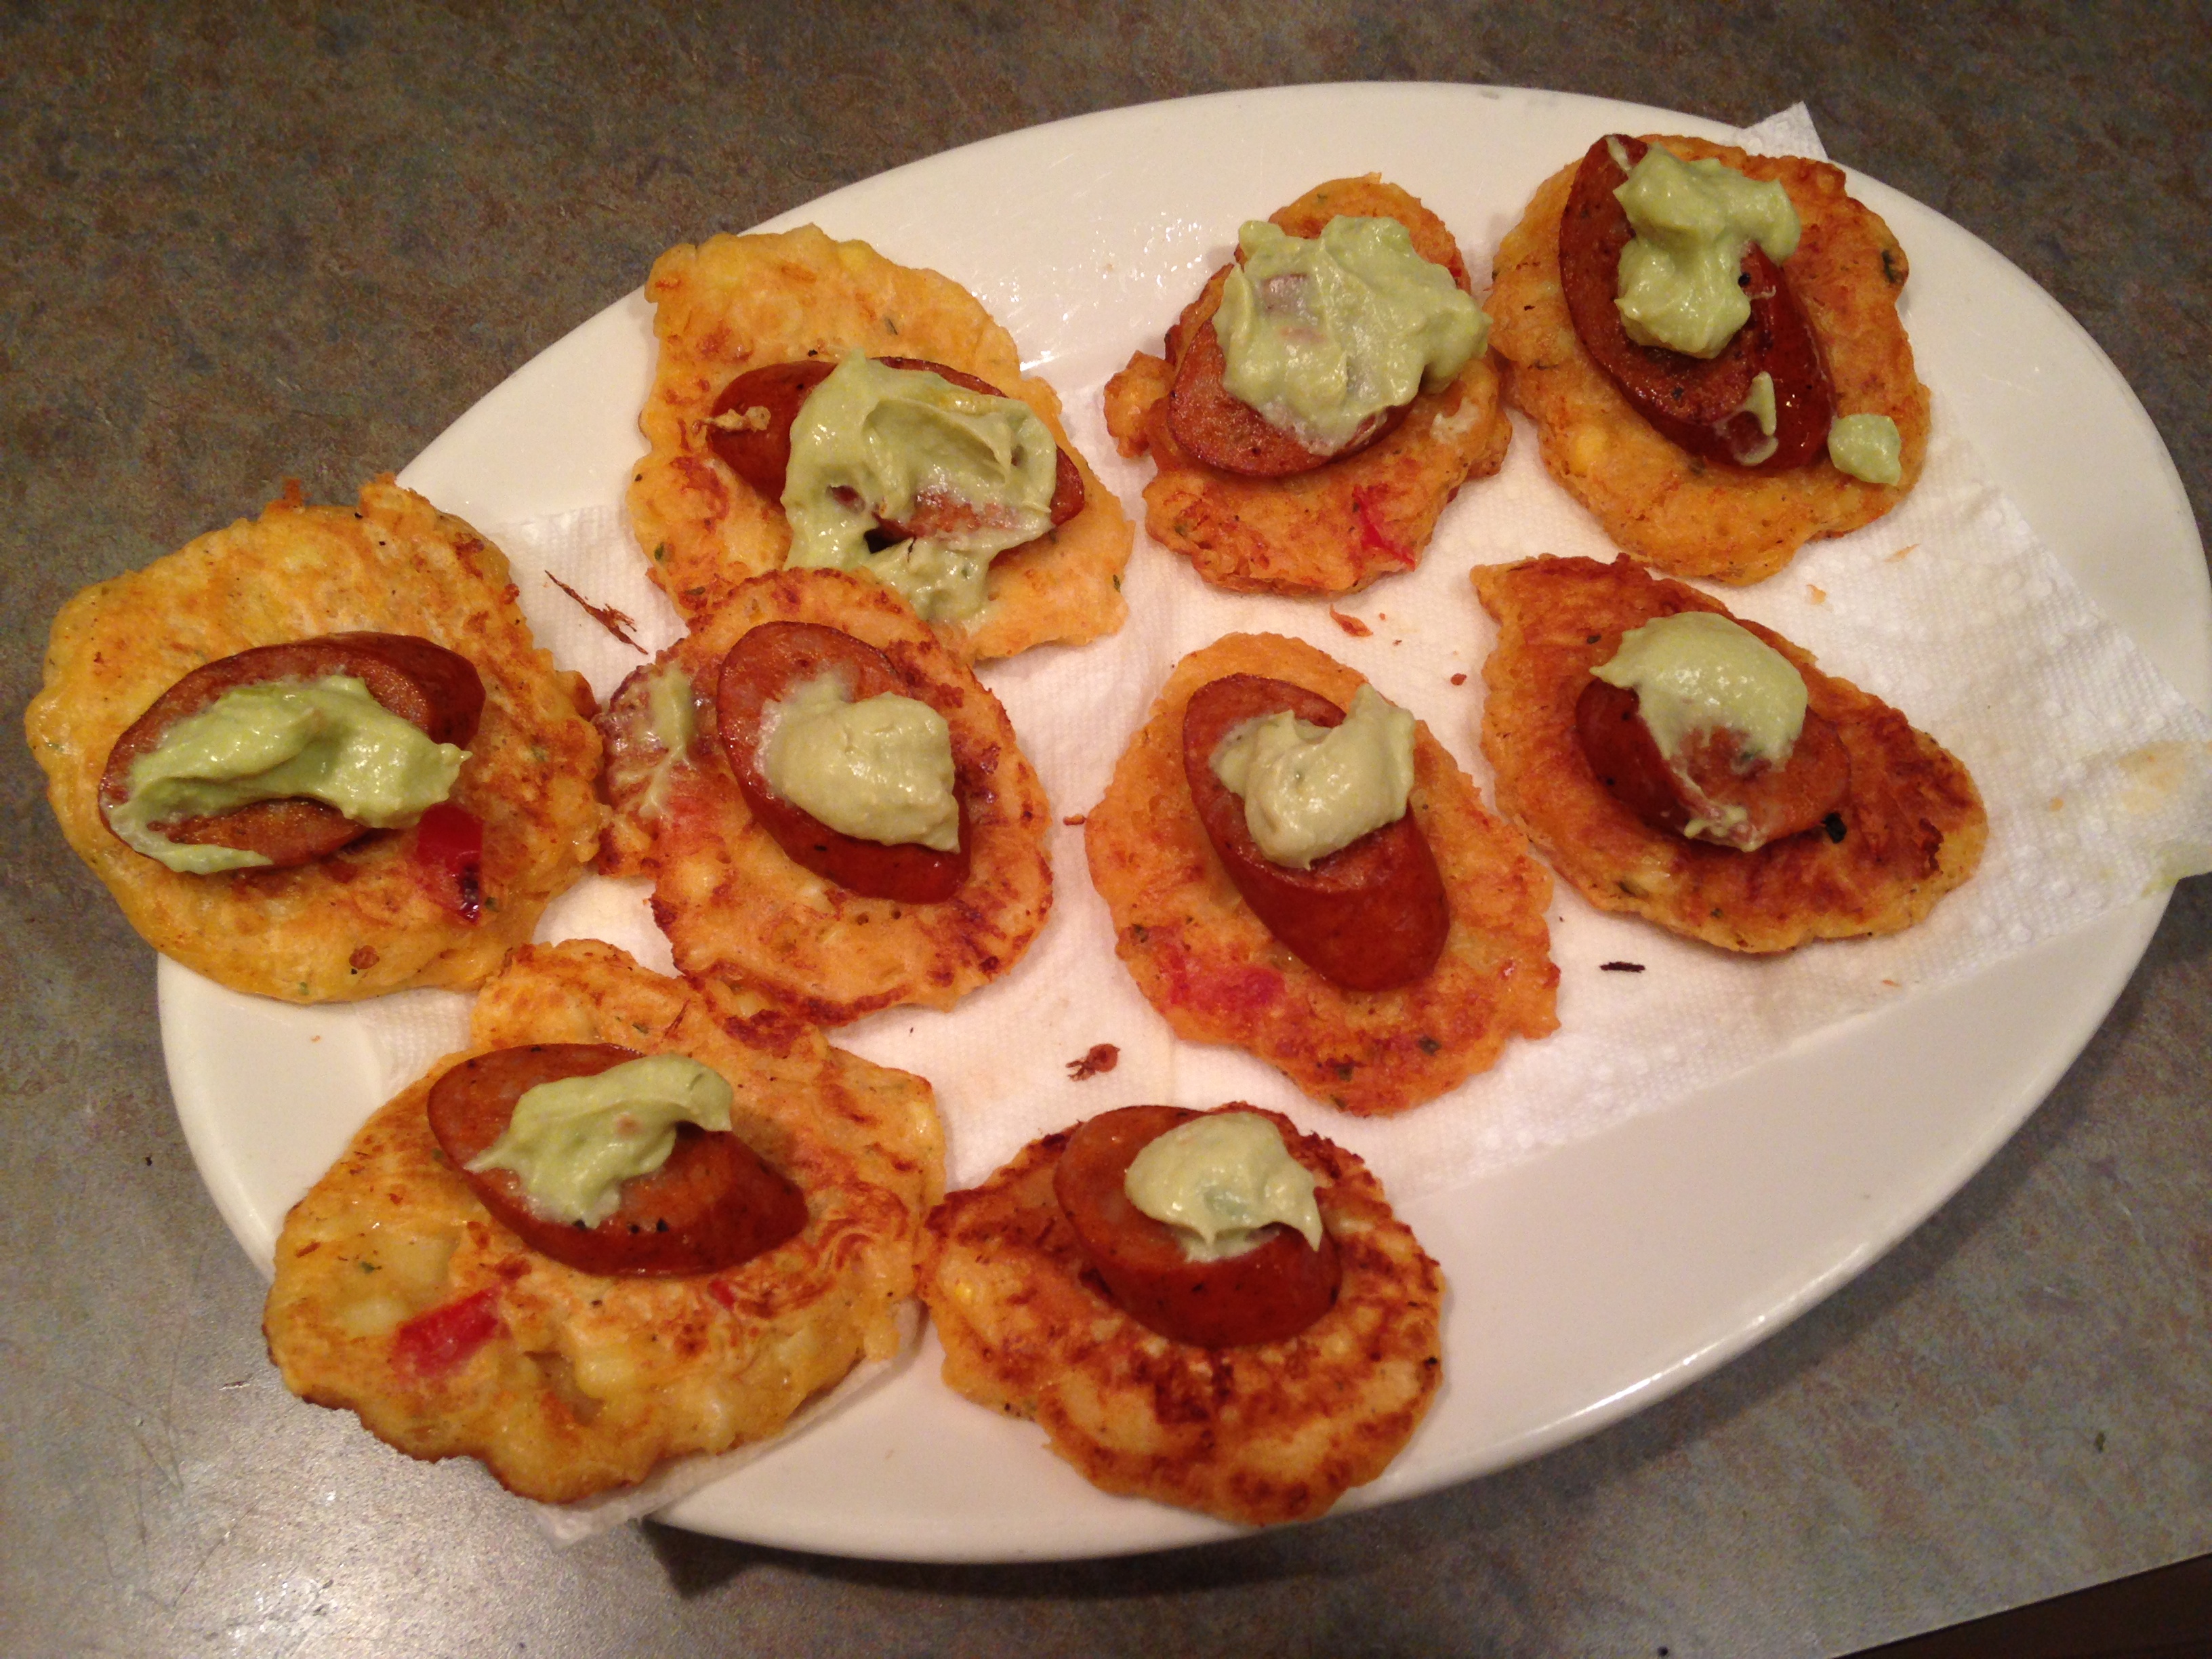
Guys, we need to stop having #fomo just because we aren’t in Austin. I re-created the feel of being down there by coming up with these sumptuous lil appetizers. You know because us grown ups have people over for drinks and apps on the weekends. Anyway, I went real southwestern with my home-made corn cakes, topped with spicy andouille chicken sausage & a dollop of my avocado sauce. It was sweet, spicy, creamy, crunchy, and filling. Everything you’d want to coat your stomach with before a night of cocktails. Plus, if you drink enough it will be way easier to pretend like your actually at SXSW.

  • 1 can of creamed corn (400 grams)
  • 2 cups of de frosted frozen corn
  • 2 eggs
  • 1 1/2 cups grated cheddar (I suggest sharp since its more flavorful, but go with whatever you have aka I may have just used leftover Mexican blend from fajita night, don’t judge)
  • 1/2 of a red bell pepper chopped small (should be around the same size of the corn kernels).
  • 1 tsp of baking powder
  • 1 1/2 cups of all purpose flower
  • 1/2 cup of milk
  • 2 tsp. smoked paprika
  • 1 tsp. cayenne pepper
  • 2 tsp. garlic powder
  • 1 tsp. dried parsley flakes
  • 2 tsp. onion powder (I would even say thinly sliced green onion would be fab for this recipe, but I had to improvise with what was in my pantry. I am trying it with that next time though because this is a definite repeat dish).
  • salt & pepper to taste

Mix the creamed corn, eggs, chopped red pepper, corn, baking soda, flour, and milk. Then fold in the spices & cheese. Then in a sauté pan heat vegetable oil at medium to high heat (you don’t want to scorch the corn cakes, but if the oil isn’t hot enough you wont get a nice crisp on the cakes). Use a large tablespoon to measure out the corn cake mixture evenly in the pan. Meanwhile, I sliced the store bought sausage and threw it in the oven at 350 degrees to roast & crisp up as I made the corn cakes. I’d say about 10-15 minutes (but mine were fully cooked, in case yours are raw increase the cooking time to 20-25 minutes or when browned). Fry spoonfuls of the batter until bubbles appear at the top & flip (like you would do with pancakes).  Allow to cook on the other side and then in a paper towel lined platter, cool the corncakes so the excess oil is absorbed. No one wants to be able to taste the grease, but they do want crispy & yummy corncakes. The batter should make about 15 corn cakes (varies based on size). Layer with a slice of the warm sausage and a cold dollop of the avocado sauce. Nosh your face off.

photo

Happy Eating, XO.

Tandoori Chicken Y’all

So I figured you are almost done using all those spices you have in the pantry from the Simla Mirch Paneer recipe. I thought I’d toss one last Indian staple your way since it is served at most restaurants & easy enough to make at home. Now, a tandoor is a clay oven so this chicken is typically charbroiled and hence has the name Tandoori Chicken. Since most of us don’t really have a tandoor laying around our backyard, grilling or baking in the oven is just as sufficient. Having said that, this is nice way to get the India feel without having to order from your local Lakshmi Grill.

  • 1/2 teaspoon kosher salt
  • 1 teaspoon red chili powder
  • 1 teaspoon paprika
  • 1 teaspoon coriander powder (aka dried cilantro powder)
  • 4 tablespoons fresh lemon juice
  • 6 tablespoons plain yogurt
  • 2 tablespoons ginger paste
  • 2 1/2 tablespoons garlic paste
  • 1 teaspoon ground cumin
  • 1/2 teaspoon garam masala powder
  • 1 lb. chicken (preferably bone in pieces)

To prepare the spice rub: In a small bowl, combine the salt, chili powder and lemon juice to make a thick paste. Rub the paste evenly over the chicken. Set the chicken aside for 15 minutes to let the flavors absorb & for the chicken to get that red color. To prepare the tandoori sauce: In a large bowl, combine the yogurt, ginger paste, garlic paste, cumin, coriander, paprika, & garam masala. Whisk everything together until it is well mixed. Rub the sauce evenly over the chicken, thoroughly covering it. Cover and place in the refrigerator to marinate for 4 hours. Preheat an oven or charcoal grill to 350 degrees F. Roast for 10 minutes, then remove and baste with some melted butter and drippings from the bottom of the pan. Return the chicken back to the heat and roast for another 30 to 40 minutes. Serve with a sliced onion and lemon wedges.

Happy Eating, XO.